How to Stack C&C Cages
Deciding on your own Cagetopia stacked-cage design? The key to stacking C&C Cages is SUPPORT and SEPARATION. There are other considerations, as well, when making the right decision on a cage setup based on your priorities, situation, space, and guinea pigs.
Stacked cages should start out from the floor up -- not on a table.
Should you put it on a Cage STAND?
Before you decide if a stand is right for you, consider your height and the height of anyone needing to take care of the pigs. Please see the section further down about how many levels are possible. Look at the height of each level and consider the reach across the top of a cage wall to the back wall and far corners for cleaning and guinea pig retrieval.
- Without a stand, you have better access to the floor if you want to be able to let your pigs out to roam more easily.
- Adding a stand will raise the overall structure, which will make the top section higher which might make it harder to reach.
- However, adding a stand gives your toes a place to go when you are standing in front of the cage. This puts you a tad closer to the cage when bending over and reaching in, which sounds trivial, but, day in, day out, year in, year out, you want to make cage access and reach as easy and as comfortable as possible.
- A stand is helpful if you have a dog and need it more out of reach.
- If you are doing a full-grid, drop-down wall on the bottom level, a stand gives the swing down wall someplace to go without being on the floor in your way.
- If you want the storage bins under the stand for supplies, you'll need a full-grid-high stand.
SUPPORT
- Construction Stress - Avoid too much tension on outer walls and connectors across long, unsupported spans.
- Sagging Stress - Without proper support the cage will sag in the middle.
- Bouncing Stress - Imagine having to live your life on a floor that is constantly bouncing when you walk. This can happen when there isn't enough support and can strain the quality of life for your guinea pigs.
You need to support the upper level well enough so that the center does not sag too much and put undue, dangerous stress on the construction. Plus, when it sags, it looks ugly, and we don't want that.
It may seem like adding a vertical grid under an upper level or loft in the middle of the cage is a good idea; however, it's not a good plan and should be avoided. First, it won't fit properly. It will push up the upper level a bit because it is going inside the Coroplast, unlike all the other grids. Second, cleaning will be difficult. Most people lay down large sections of fleece in the cage. You'll need to go around a vertical grid with a custom fleece liner solution as simple cage liners won't work; it will be divided up. Third, the grid will likely get gross from the pigs pooping and peeing in corners or against it. And last but not least, inner vertical grids are a safety hazard for pigs running into them and possibly getting their head caught if they are young or have a smaller, narrowly-shaped head.
Cagetopia® ULTRA RODS for Support!
The secret to good support is using the right length of a high-quality, unbending rod and securing it TIGHTLY, UNDERNEATH the floor grids of the upper level using zip ties. Our Cagetopia® Ultra Rods are manufactured for us to our quality and design specifications and not available elsewhere. They are a thick, high-quality, powder-coated steel, yet slender and low-profile in look, available to match your grids in either black or white. They are machined to a snug fit making for strong extensions. You might need our longer-tailed zip ties or some bigger ones of your own if it needs to go around multiple wires. Secure with zip ties as needed along the length of the cage. You are tightening the floor of the upper level to the strong, steel rods. The rod should extend just a bit past the end wall grid and be secured to that as well.
Rod Location
Typically, you would put the rod towards the front, right up next to the perimeter grids. But, if you have something in the way, like a ramp coming down in the front, you can put the rod in the center (backbone). It can also go just far back enough to clear any obstructions as long as it's more in the forward front of the cage than the back -- for strength.
The Cagetopia® Ultra Rods
Cage Requirements
The SMALL, 2x3-grid cage doesn't need a support rod. Properly secured grids and connectors provide enough support across the 3-grid span. Cages longer than 3 grids need support.
Our Cagetopia® ULTRA RODS can be combined in various ways to get the length you need!
Our two shorter rods of 18" and 32" (Short and Medium) are an INNER dimension rod and fit inside our OUTER dimension rod of 37" (Long).
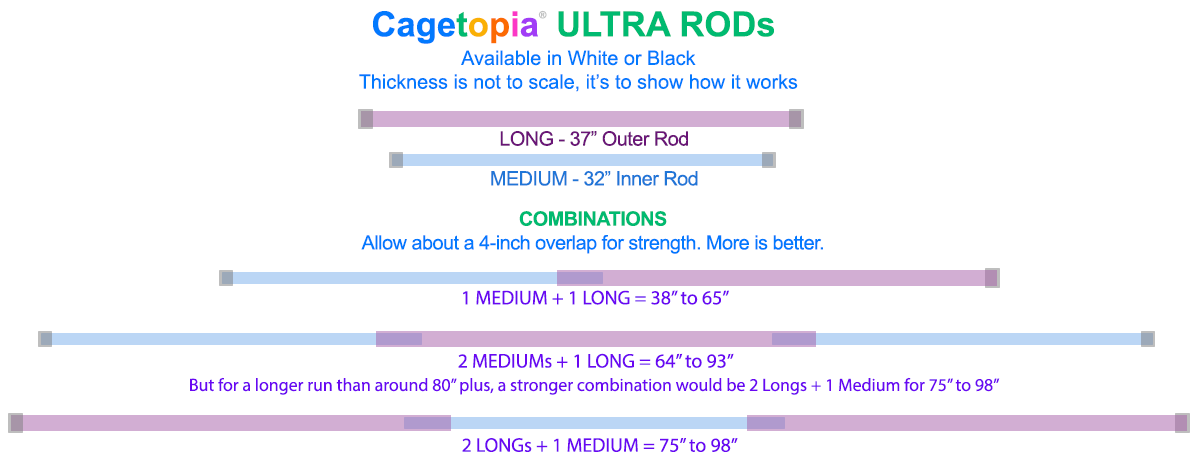
Rod Sizes Needed by Cage Size
For regular cage sizes, here are the rod lengths needed to support it end-to-end. We've added a couple inches of wiggle room to each length.
Adding Windows
Windows look cool, but have some downsides. For this purpose, keep in mind that our full-size, high-quality acrylic windows are heavier than a grid and add a bit of weight. So, if you want windows, try to keep them on a lower level. Our windows fit snugly into our connectors, but there are no holes drilled for additional zip-tie support or to connect to other grids -- especially needed at corners for strength and under lofts and such for engineering strength for the entire structure. So, use them judiciously if you are wanting them.
Windows will look less than pristine over time, you can't put a water bottle through them, and they block air flow for your guinea pigs who have a much stronger sense of smell than we do. Windows cannot be used with a Patio or next to a Lookout Lounge.
SEPARATION
You need to make sure you have GENEROUS space between the levels for
- AIR FLOW
- LIGHT
- ACCESS for RETRIEVING your guinea pigs, and
- ACCESS for CLEANING
HOW MANY LEVELS can you stack?
EACH LEVEL = about 15 INCHES (allowing room for connectors) with REGULAR 14" grids.
Normal COFFEE Table height = about 15 inches.
Normal REGULAR Table height = about 30 inches.
When the CAGE is on a TABLE: the top of the cage = about 45 inches (almost 4 feet).
When the CAGE is on a TABLE with a LOFT: the top of the loft = about 60 inches (or 5 feet).
Keep in mind, if you are considering a loft in the mix, it's like another 15" level.
A STAND + 1st Level Cage + 1 Full-Grid Spacer + 2nd Level Cage:
The top of Cage = 15+15+15+15 = 60" (same as a regular cage with a loft on a table, it's a tough reach, made easier with a drop-down front wall)
A SHORT, HALF-STAND + 1st Level Cage + 1/2 TALL-Grid Spacer + 2nd Level Cage:
The top of Cage = 6.75+15+8.25+15 = 45" (same as a regular cage on a table)
The tradeoff with this setup is less head-room to get in there and clean and manage the lower level (more ducking) and less light, but an easier reach on the top level.
1st Level Cage (floor) + 1 Full-Grid Spacer + 2nd Level Cage:
The top of Cage = 15+15+15 = 45" (same as a regular cage on a table)
You can stack TWO levels of cages in a variety of configurations and with the right designs, they can be made as easy to clean as possible.
Grid Spacers refer to the level of grids around the perimeter of the cage, except the front wall, between levels for access and light.
Avoid 3 Levels
Three is really asking too much. Avoid the temptation to try it. It will be too tall to reach in to clean it or to get your pigs out or do proper daily care and feeding and refreshing. The whole point of our C&C cage designs is keeping them easy-to-clean as well as safe and healthy for your guinea pigs AND you!
Not only would 3 stacked cages be too high for decent access, it can be unstable (wobbly) without adding vertical corner supports or additional bracing. If you try to make it more accessible by shortening it, you'll be compromising the quality of life for your pigs (too dark, not enough air flow) and making it harder to reach in and access. We don't recommend them.
3 levels, in theory
The most compressed possible would be the following. Keep in mind, it's really better to have a full-grid height between levels, both for you for access and for the pigs for light and air.
1st Level Cage (floor) + 1/2 TALL-Grid Spacer + 2nd Level Cage + 1/2 TALL-Grid Spacer + 3rd Level Cage:
The top of Cage = 15+8.25+15+8.25+15 = 61.5 (top level would be a tad higher than the loft on a table cage. You can barely reach to clean across that top grid on a loft. You would HAVE to make sure to use a drop-down wall for access to the cage at that height and it's still a stretch for a 5'8" adult.
Tips and Tricks for Building 2-Level Cages
- Start from the bottom up of course, especially if you are starting with a cage stand on the bottom! Makes sense, right? But, we know all too well, even when you have a planned cage stand, some folks are anxious to get their pigs into the cage, so they start with the Cage first. You'll have to undo all the connectors if you do that, because the perimeter connectors are shared between levels and turned on their edges to accept the grids -- and that's different than when you start building a stand-alone cage.
- Reinforce with ZIP TIES -- every single connection -- as you go. A strong foundation makes for a strong cage. This is a general C&C building tip, but it is EXTREMELY IMPORTANT for multi-level cage builds. That means, as you are building the grid connections, get the grids seated all the way into the connector. When it's firmly seated, add a zip tie right above, directly below, or to the left or right of a connector. Our Cagetopia Connectors and Cagetopia Grids work great together. Cages are more structurally sound when using connectors and zip ties together, rather than zip ties alone. It's just a physical fact. And well-seated connectors are even more important when getting creative with levels, lofts and special layouts.
Covering a Stacked Cage
All stacked cages can be covered, some require more ingenuity. The thing about covering cages is that you have to be able to easily open them for cleaning, feeding and retrieving your guinea pigs.
If you decide on a Swing-Down or Swing-Open wall on the TOP-level cage, then consider the fact that the top cover must be opened and flipped back or tented back first, because when you open the vertical drop-down wall, the cover won't have anything to rest on. You'd want to do that anyway (open the top first); just be aware.
Covering the TOP Level
Covering the top level is straight-forward and should be the same as covering a non-stacked cage. Whether a single level or one with a loft, you choose the cover configuration that matches your design. Keep in mind that if you have an offset loft on top, you go up one size on the cover needed as explained further down in this article about lofts.
Covering the FRONT Wall Opening
Covering the front wall can be done in a variety of ways. It's a good idea to think through your day-to-day access and determine the easiest approach with all things considered.
For the lower-level cage, you will likely be on your knees in front of the cage, perhaps with a plate or bowl of food, hay, cleaning materials, etc.
Some Stacked Cage Examples